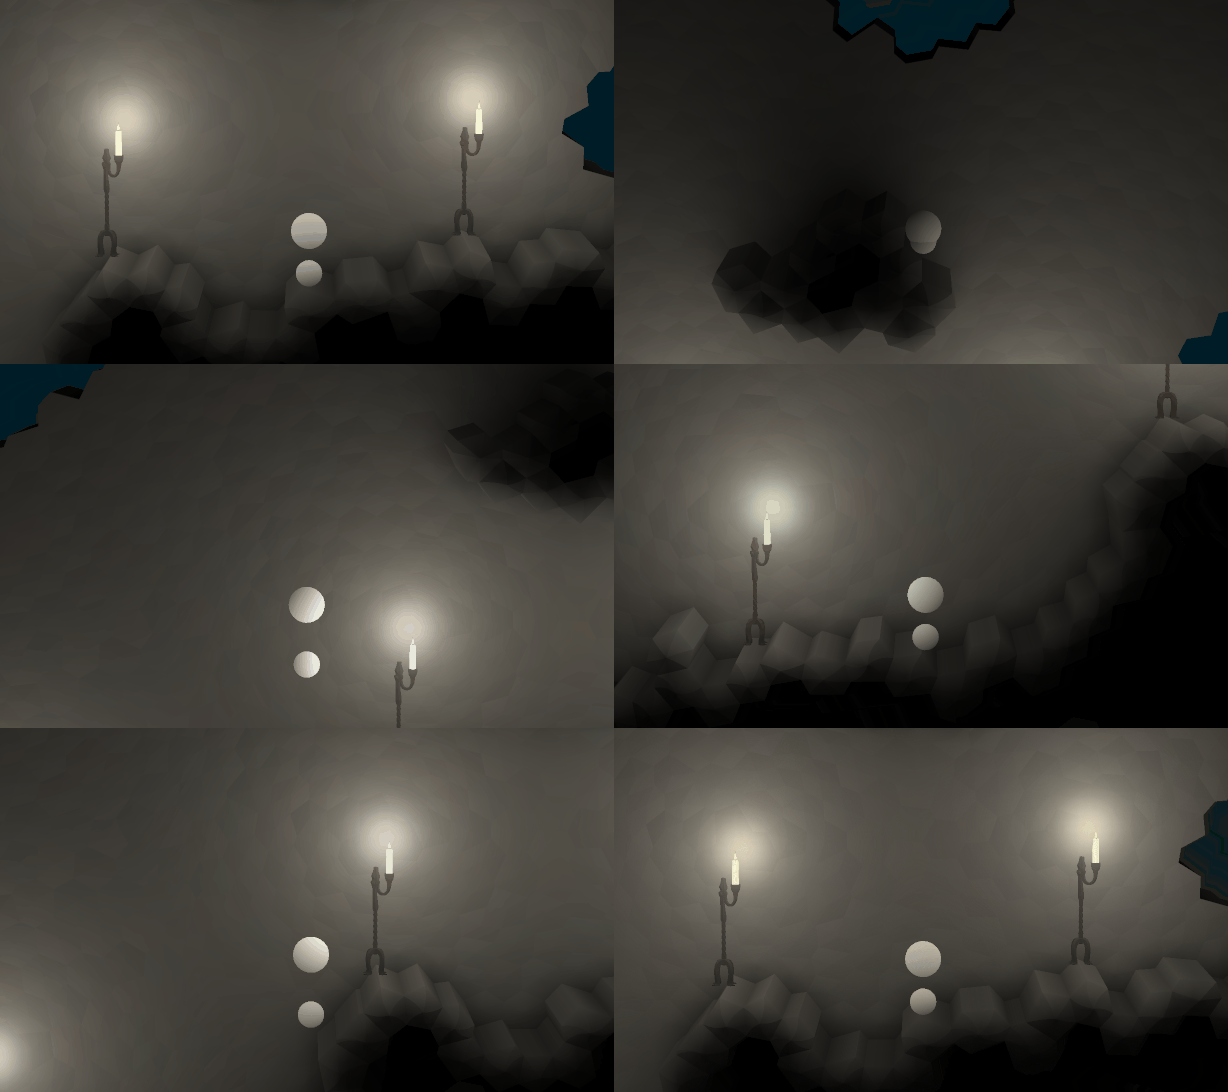
One of the looming technical challenges in Sun Shy is getting a character to look right as they run and jump around. For most of our game’s development, our character has looked like this:
We’ve known for a while what we want our characters to look like – the player character of Sun Shy is to be a long-legged satyr-looking biped creature. Here’s some very old concept art from Halley that gives a bit of the vibe:
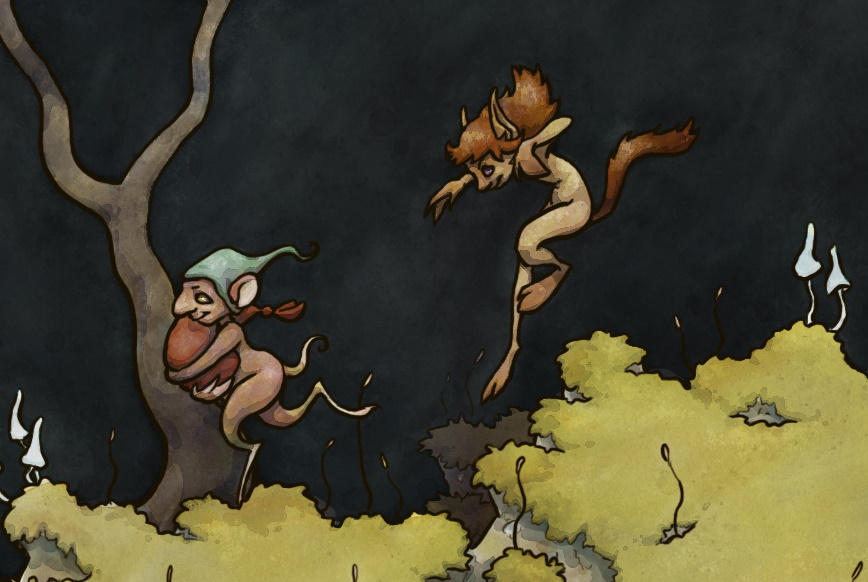
As a programmer with no artistic skills, I consider artists to be wizards of some kind, so I feel a lot of trust has been placed in me when I’m trying to recreate something like the above feel with code. There are various stylistic choices that can be made to make this kind of thing easier – give your characters short legs and take very fast, short steps, for instance, or giving them feet with no legs (like Rayman). These are/were all certainly options, but thanks to the support of Creative Victoria I have time to try doing it the hard way.
This post is a long one, and I don’t even really get to the bottom of it here. I’m sure I’ll be talking about animation-related things again in the future.
A note about game design philosophy
One part of this process is something we consider non-negotiable – visuals are in service to gameplay, not the other way around. We tuned the player controls so that they feel right before we started thinking about animation, and if it turns out that the way the player controls is impossible to animate without it looking goofy, we’re going to have a goofy-looking game and that’s just the way it is. At no point will we allow any of the systems mentioned in this blog post feed values back into player movement. This is mostly a game design thing – if the player wants their character to do something, but the character can’t do it because their feet aren’t in the right place, and the positioning of their feet is controlled not by the player but by our animation code, that’s not fair to the player. Also, what feels right and what looks right aren’t necessarily the same, and given the kind of game we’re making, the first one wins. I’m not trying to impose this rule on all game developers everywhere, and there have been some pretty notable games that go the other way (the movement in the old Prince of Persia games was animation-driven and worked pretty well, for instance), but it’s how we’re doing Sun Shy, and probably how all Snake Hill games will be done in future.
There’s also a technical reason for this. The systems described below can be expensive, and we want to be able to turn them down or off if necessary. Not just in a ‘turn down the graphics settings’ kind of way – if there are a hundred entities walking around, and only three of them are on screen, we want to only do the complex footfall calculations for the three that are visible, and we don’t want that change to affect movement. It also means in networked situations, the client can do their own local footfall calculations rather than needing to sync it over the network.
Inverse kinematics and foot placement
There are two parts to this problem – where to put the feet at any given time, and having done that, how to draw the leg. The second problem is solved with something called Inverse Kinematics, often abbreviated to IK. Today I’m just going to be talking about foot placement, because the IK part of this took place outside the Creative Victoria research. It does have a few interesting things to be said about it, though, especially because the creatures we’re animating here have two knees per leg – I’ll be writing a blog post about this later on.
A straightforward attempt at foot placement
The first attempt we made to have feet get placed coherently was vaguely inspired by David Rosen’s GDC talk about procedural animation in Overgrowth. (I say vaguely, because they’re really not terribly similar, and I don’t want to implicate David in the fact that this technique didn’t work for us.) Our plan was essentially to create an ellipse, roughly where the player’s feet should be, and move two feet around that ellipse. We would then do a ray cast straight from the player’s hip to the current foot location, and if it hit something, place the foot there.
This method was initially quite promising. The foot isn’t really planted, so this system doesn’t guarantee a lack of foot skate, but if you base the rotation rate of the ellipse on the horizontal velocity of the character you can make it look pretty convincing. It even looked pretty good while the player was airborne without any further work – they’d kind of flail around in the air, but while it looked a bit comical, it was okay, and mostly not broken.

The problem proved to be the ‘mostly’. The last 10% of quality here was elusive – sometimes foot skate reared its head, so we made a system to actually lock the feet to world space when they hit something, then lerp them back to the ellipse when they stopped hitting something. That ended up having feet sometimes get located weirdly up on ledges when the player was running towards a step and then stopped at the last minute. We also needed to do some raycasts to determine where the centre of the foot ellipse should be, and then some smoothing of those values so it wouldn’t pop when the player walked over a ledge.
Ultimately the system became incomprehensible. I ended up with variable names like footGroundedHeightSmoothedFudgeMultiplier, and trying to fix a given problem involved way too much trial and error. Worse, fixing one problem would often break something else. In other words, all the problems that usually come up with badly written code. This is what inspired the next attempt – a system that, whether or not it works, might at least make sense to me rather than being a bunch of hacks hanging together in strange equilibrium.
The Analytical Approach
So, what’s the opposite of the above ‘make something up and hope it looks kind of good’ approach? Simulate everything! You can probably guess from the number of subheadings that this is the approach that eventually worked, or at least currently shows the most promise. Mentally, I broke this part of the task up into three sections:
- When a given foot should start a step (timing)
- Where that foot should be stepping to (foot placement)
- How it’s going to get there (stride shape)
I won’t be going through these in turn, because it’s not the order I actually solved things in the end.
Stride shape
The shape a footstep takes is probably the least analytical part of the process. Basically, it’s a spline – the foot moves along it. Formally, it’s a cubic Bézier spline – the same things that you draw with in vector art programs. This isn’t even remotely based on a physical system. This kind of spline has four control points – the first and last will be the location the foot is coming from and the location the foot is targeting, and the second and third will determine the shape it follows to get there. So far we have adjusted this basically by eye, and it’s been okay, but it’s a future target for tweaking to make things look nicer after other parts of the rendering (such as bringing in actual skinned character meshes) have been polished.
Using splines here has a few major advantages. Splines are very predictable – we can decide exactly how long we’re going to take to traverse the spline, and then ensure that it happens, by simply ticking our T value appropriately. This means we can look ahead and say “We need this foot to be at this location exactly this many frames in the future”, and it will definitely happen. Somewhat more complicatedly, it also allows for retargeting of a step – we can get the parametric form of a spline and take its derivative to get its velocity at any point. This means that if the player is half way through a step and they need to put their foot somewhere else instead, we can create a new spline from the current position to the new target without any discontinuities in velocity or position (which looks unnatural)
Foot Placement
This turned out to be one of the biggest, trickiest parts, but it also has some of the most actionable advice for anyone out there attempting a similar system. That advice is: Prediction is king.
Our initial plan involved predicting where the player would be by using simple dead reckoning – that is, we just take the character’s position and velocity, and if we want to know where they’ll be in n seconds, we assume it will be currentPosition + currentVelocity * n. This will be accurate assuming our velocity stays constant
Because we’re using splines for our stride shape, we can dictate exactly how long a given stride is going to take – so when a foot determines that it needs to initiate a step, we know exactly how far in the future it’s going to land. So we simply predict where we’re going to be at that time, and do some raytraces down from there to find an appropriate target for the foot to plant. This is going to be great.
Turns out, it isn’t great, because dead reckoning sucks. Behold:
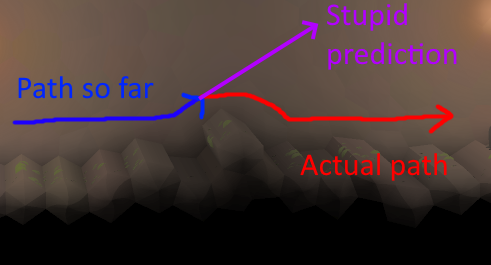
Essentially, any time our character would have a path that wasn’t totally linear, such as running over a bump, the system might fail badly. Any time it happened to initiate a foot step while on the upward step of a bump, it would say to itself “Well, where am I going to be when this foot needs to land… IN THE SKY APPARENTLY” and then start flailing as though it had just run off a cliff (I regret that I didn’t save any gifs from this period, and I’m too lazy to go back through version control history for them, but it was mostly less hilarious and more just broken-looking).
Biting the prediction bullet
It became apparent that we were going to have to do this properly. We were going to have to simulate ahead of time where our player’s character is going.
At this point, I realised there wasn’t anything in between the half-arsed ‘project velocity forward’ method, and a complete ‘predict by simulating the player’s movement for a little while into the future’ solution, so that’s what needed to happen. This seems like it would be straightforward – or rather, it seems like something your engine would do for you, so you wouldn’t have to worry about it. Unfortunately, that’s probably not true.
The reason it’s not always true is that physics engines don’t always let you say “Hey, this one single rigid body, could you simulate it in isolation for a few seconds, then throw all that information away and go back to the current frame”. For instance, I believe Unity has a function Physics.Simulate() that allows you to look ahead, but you can only do this for the entire world, not a single object. I believe Box2D could be persuaded to do something similar, but I think this would only be acceptable for a relatively simple game (in terms of physical complexity) – Sun Shy can easily have dozens or hundreds of rigid bodies present, and thousands of pieces of static collision geometry, so I don’t think this would be very feasible.
This leaves us with the not-terribly-fun option of recreating a simplified version of our own physics engine so we can run our own look-ahead simulation each frame. Remember that this doesn’t have to be perfect – and indeed, it can’t be because the look-ahead can’t know what the player will input. In our case, we have to reproduce simple physics, as well as the scripted game entity behaviour described above (the circle cast down and the foot spring and all that). Simple physics is done something like this:
position += velocity * deltaTime;
velocity += force * deltaTime / mass;
The force comes from gravity and whatever controller forces we have cooked up. Proper physics people call the above technique ‘Euler integration’, aka the least accurate kind of integration, but for our purposes it’s acceptable.
We also have to attempt to reproduce collision response. This is a bit hairy, but bear in mind that we can still use our physics engine’s collision query, we just can’t simulate – so we can check if a collision will occur in the future, and just cancel the velocity in the direction of the collision normal by using vector projection. This isn’t perfectly identical to what the physics would do for collision response, but in practice it turned out to be okay.
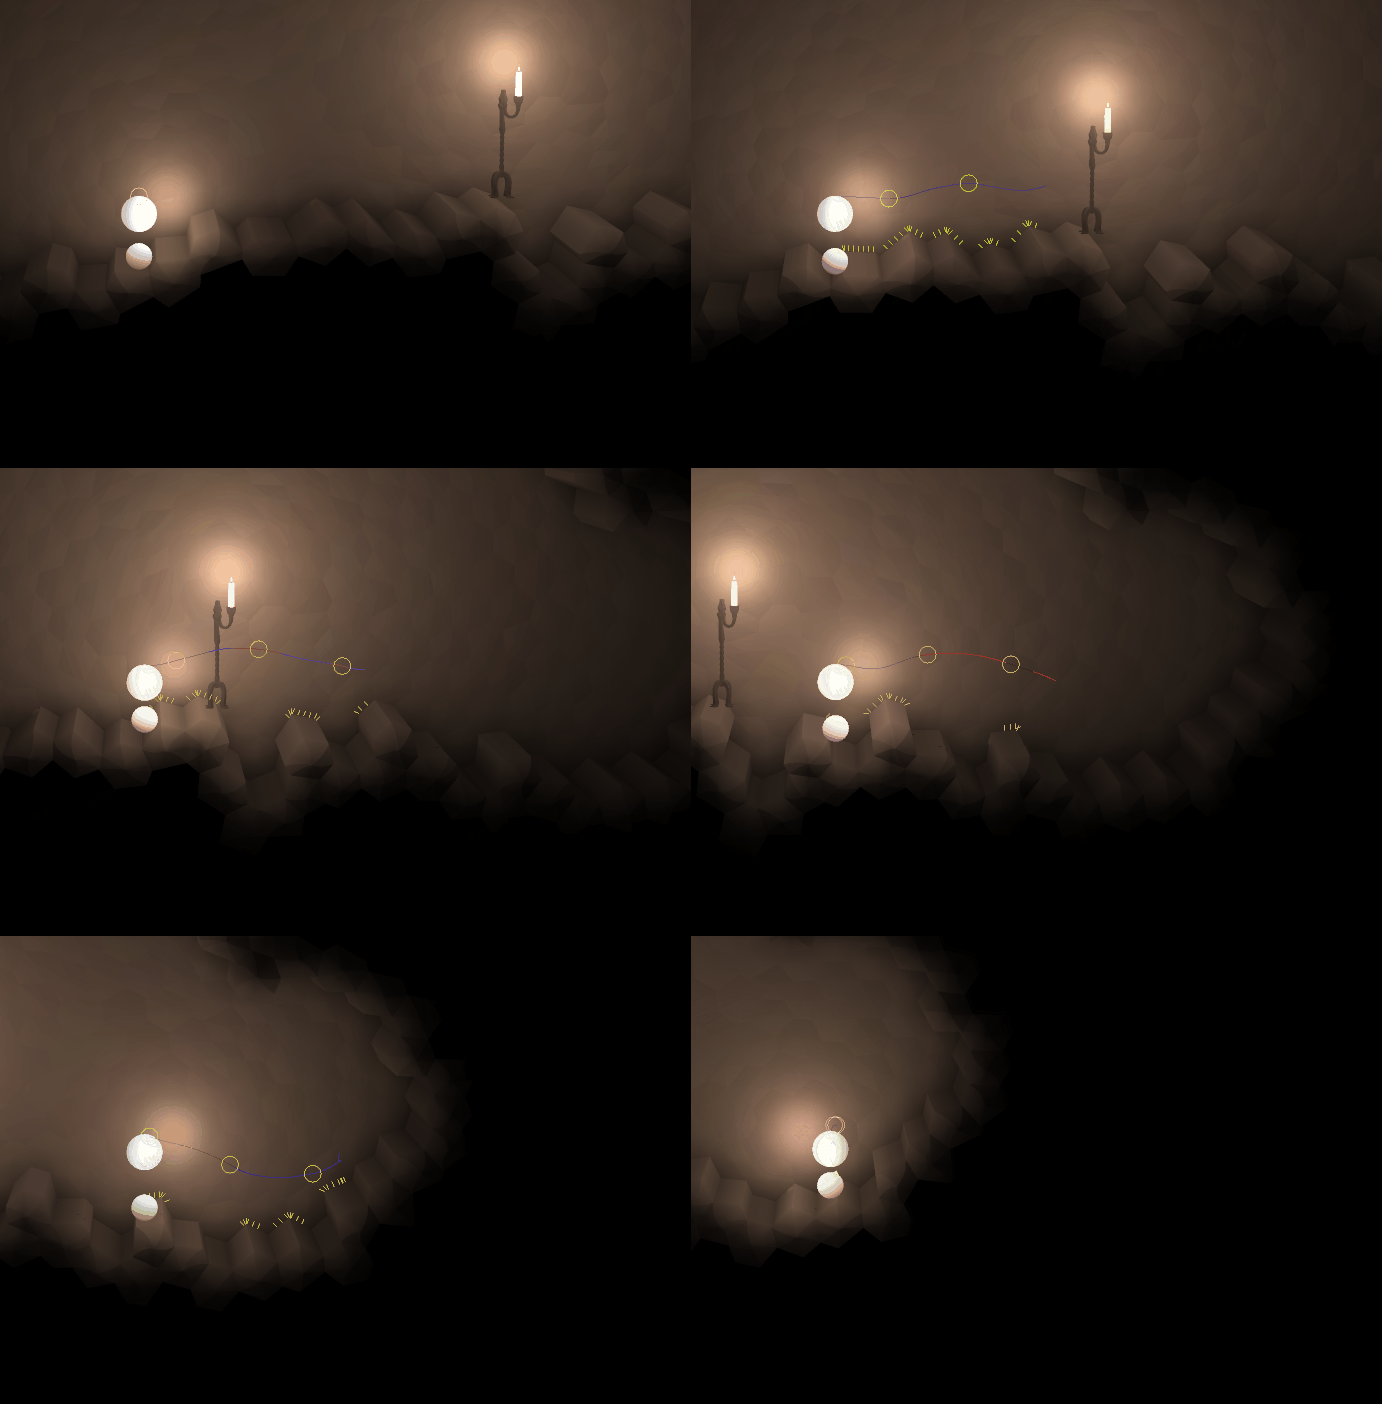
It turned out to be invaluable for tweaking this mini-simulation to draw the line of predicted positions, as well as kind of reverse-breadcrumbs every ten frames or so to show where the player is predicted to be at frame 10, 20, etc. In theory, if you get things perfect, the circles should be stationary except when something unexpected happens (like the player jumps or changes input direction).
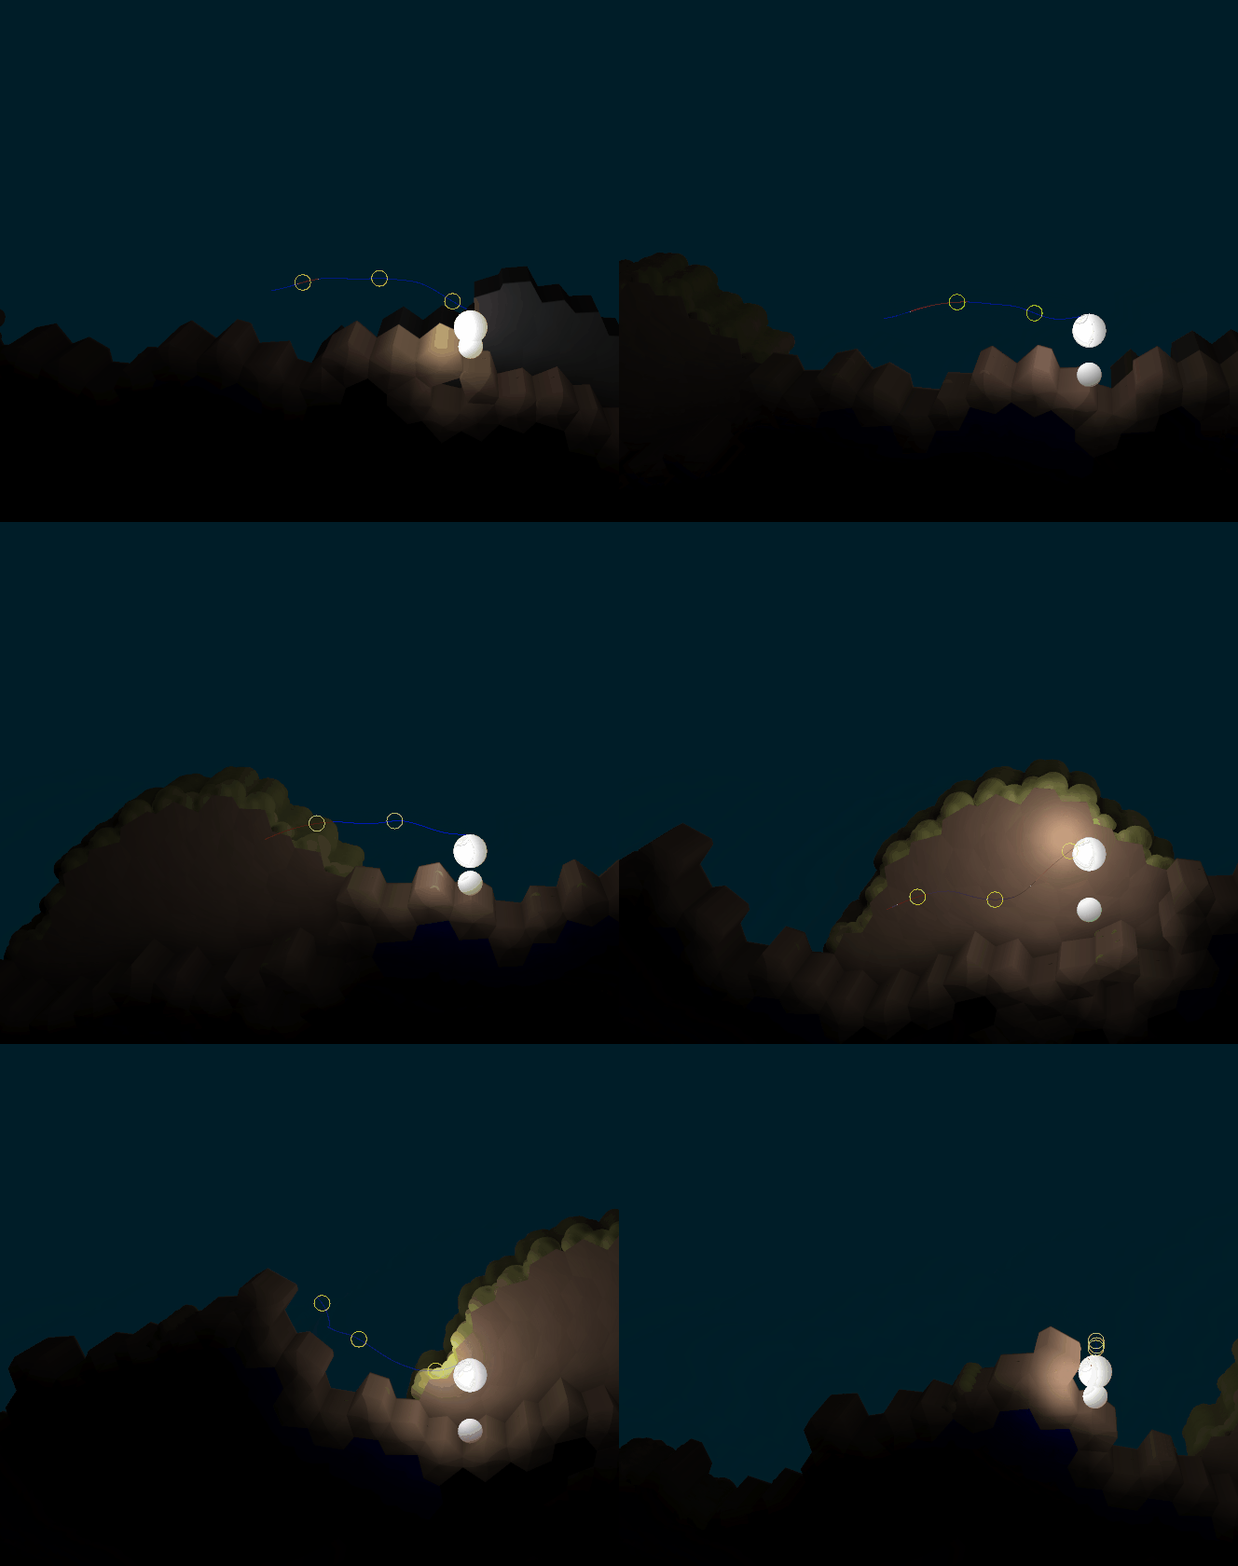
Note that the blue bits of the line correspond to the points in the prediction when the player’s ‘foot’ is touching the ground, and the red parts are parts when the player is predicted to be airborne. This turns out to be helpful later on.
Also, note that this prediction isn’t cached in some fancy way – we’re calculating about sixty frames into the future, then throwing it away and redoing it, every frame.
Footfall placement for ‘free’
Now that we’re basically running a mini local version of the player update step to predict the player position, it turns out we get something else of value here. Our player update step involves circle casts downwards to look for a base of support – so in addition to our array of future positions, we can record an array of future support locations. We can use these as potential places to put our character’s feet! Even better, these positions have the following advantages:
- Already calculated
- Definitely correspond to where the player is standing and has a sensible place to put their feet – it won’t report a footfall location at the bottom of a narrow gap or something like that.
- Tends to favour high or upward-facing surfaces, as feet usually would.
- Comes complete with surface normals, so we can look for more suitable options based on surface orientation.
Visualised, here’s what our footfall predictions end up looking like:
Not actually for free, though
Not so surprisingly, there’s a little bit more work to do here.
Look at that last gif. If we took the next two yellow circles as the timing for our next steps, and the corresponding furry yellow normals as the place to place the foot, we’d be in reasonably good shape, right? But look closely. Unfortunately, this isn’t possible – and worse, it’s impossible for a somewhat unfixable reason. The yellow circles happen at evenly spaced intervals in the future, and sometimes, those intervals happen when they player is airborne. Sometimes we’re properly airborne – like, we’ve run off a cliff or jumped or something – but other times, it’s just a slight hiccup in the shape of the ground we’re running across, so there’s nowhere to place your foot for a bit. So, what do we do?
The way I’ve gone here is to take the yellow circles as a place to start searching in our prediction array. Searching back from that point suggests taking a short step – like how you might take a shuffling step or two if you’re running up to an edge you have to jump off, just so you have your strong foot land just on the edge. Searching forward in the array corresponds to delaying the step. This is more ‘dangerous’ because if we delay a step too long, it can look unrealistic – anyone can take arbitrarily short steps, but as steps get longer they start to look physically impossible. Ultimately I ended up searching backwards about five frames and forwards up to about eight, but these values will vary wildly for different implementations.
I did a lot of experimenting here to get things to look right, and if I tried to recount every detail I’d never finish this article. However, there are two pieces of information I came away with that I can share to save some time for anyone attempting something similar:
- If you have to shorten or lengthen one step, you shouldn’t have that affect the timing of the steps after it. It seems logical to do this (ie the next step happens three frames early, so subsequent steps will all happen three frames early to keep the timing right), and not doing it will mean a short step tends to get followed by a long step. I think that’s just how bipeds work. I’m no animator, so I can’t fully justify this, but delaying subsequent steps when you take a long step just made things look off to me, in a way that was immediately fixed when I removed that feature.
- When you’re searching for an ‘ideal’ foot placement, it can be good to have a scoring system, where you award a footstep candidate ‘points’ for things. The system I used awarded points for being close to the ideal timing (the yellow circle), for the normal was facing more upwards, and for being physically higher up. This effectively caused footfalls to favour the tops of rocks and other obstacles. If you character runs up and down smooth slopes, though, you might want to de-emphasise the favouring of high ground.
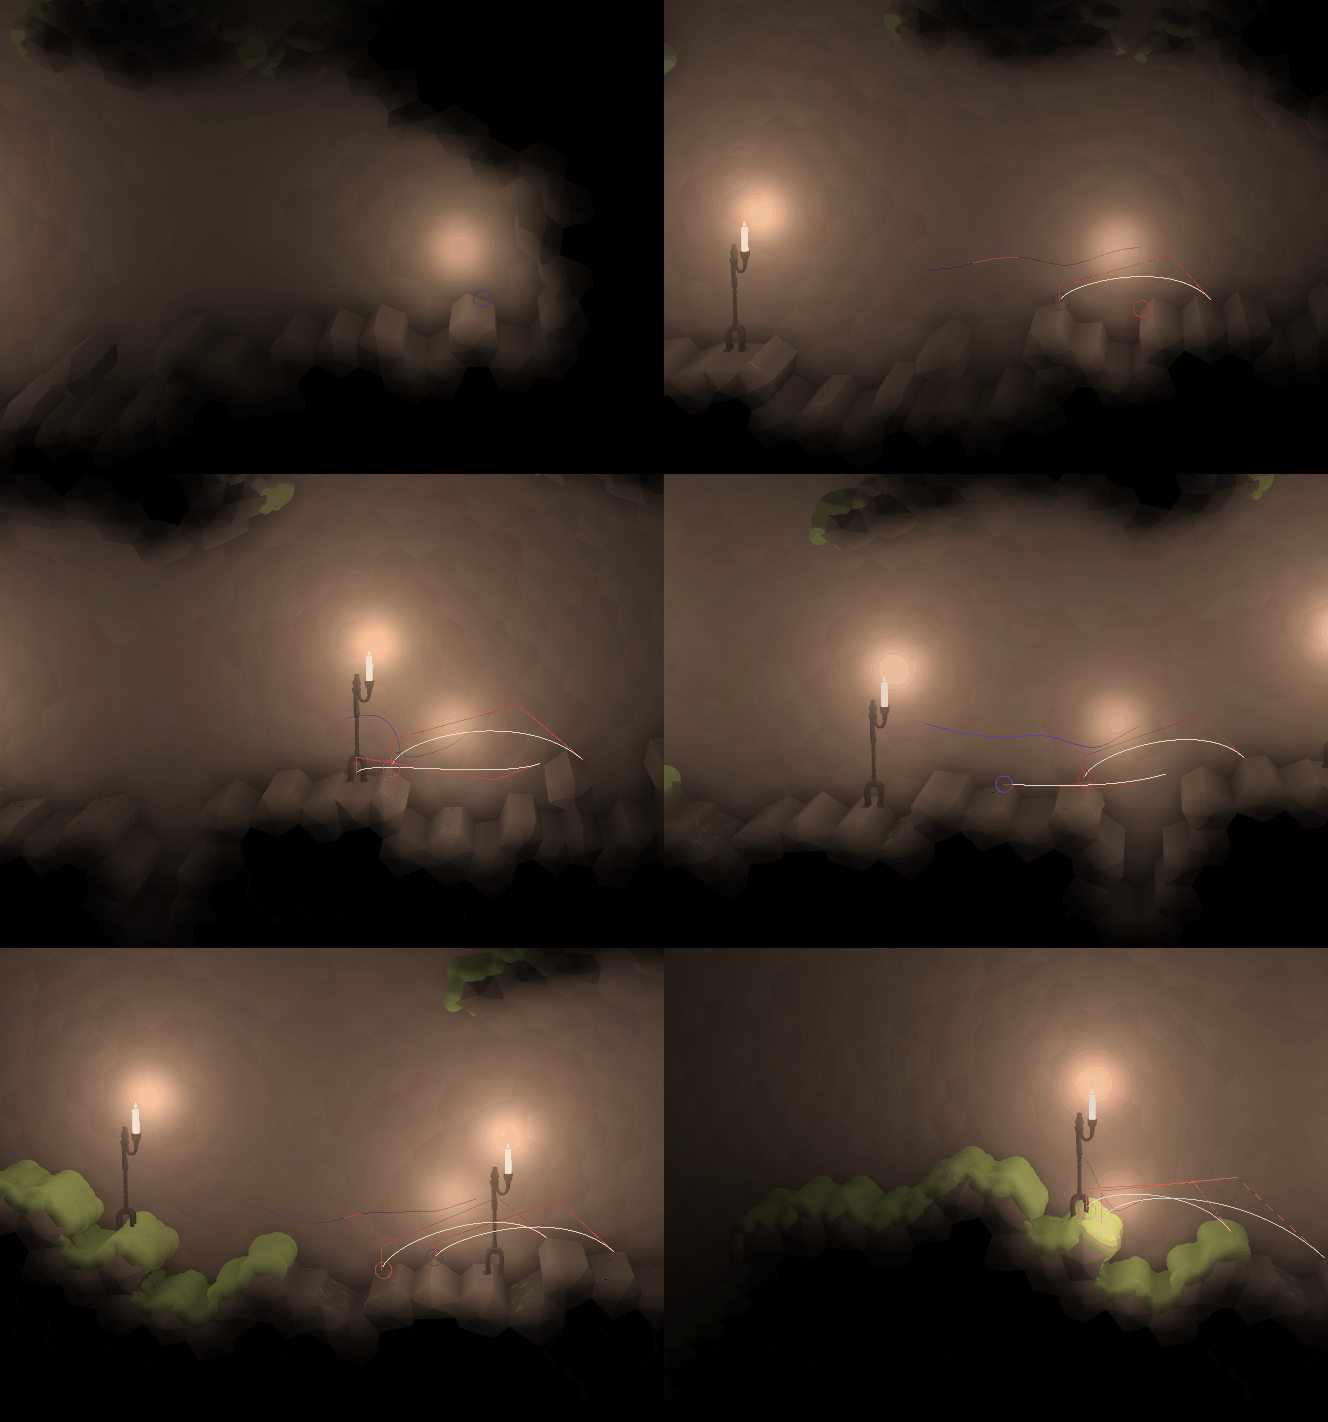
With that all put together, here’s a visualisation of the strides themselves. The actual control points can be kind of made up. There are a few tweaks I gave mine, the subject of another post perhaps, but it’s mostly just taking a pre-built roughly square shape and shearing/scaling it to fit the vector from the foot origin to the foot target.
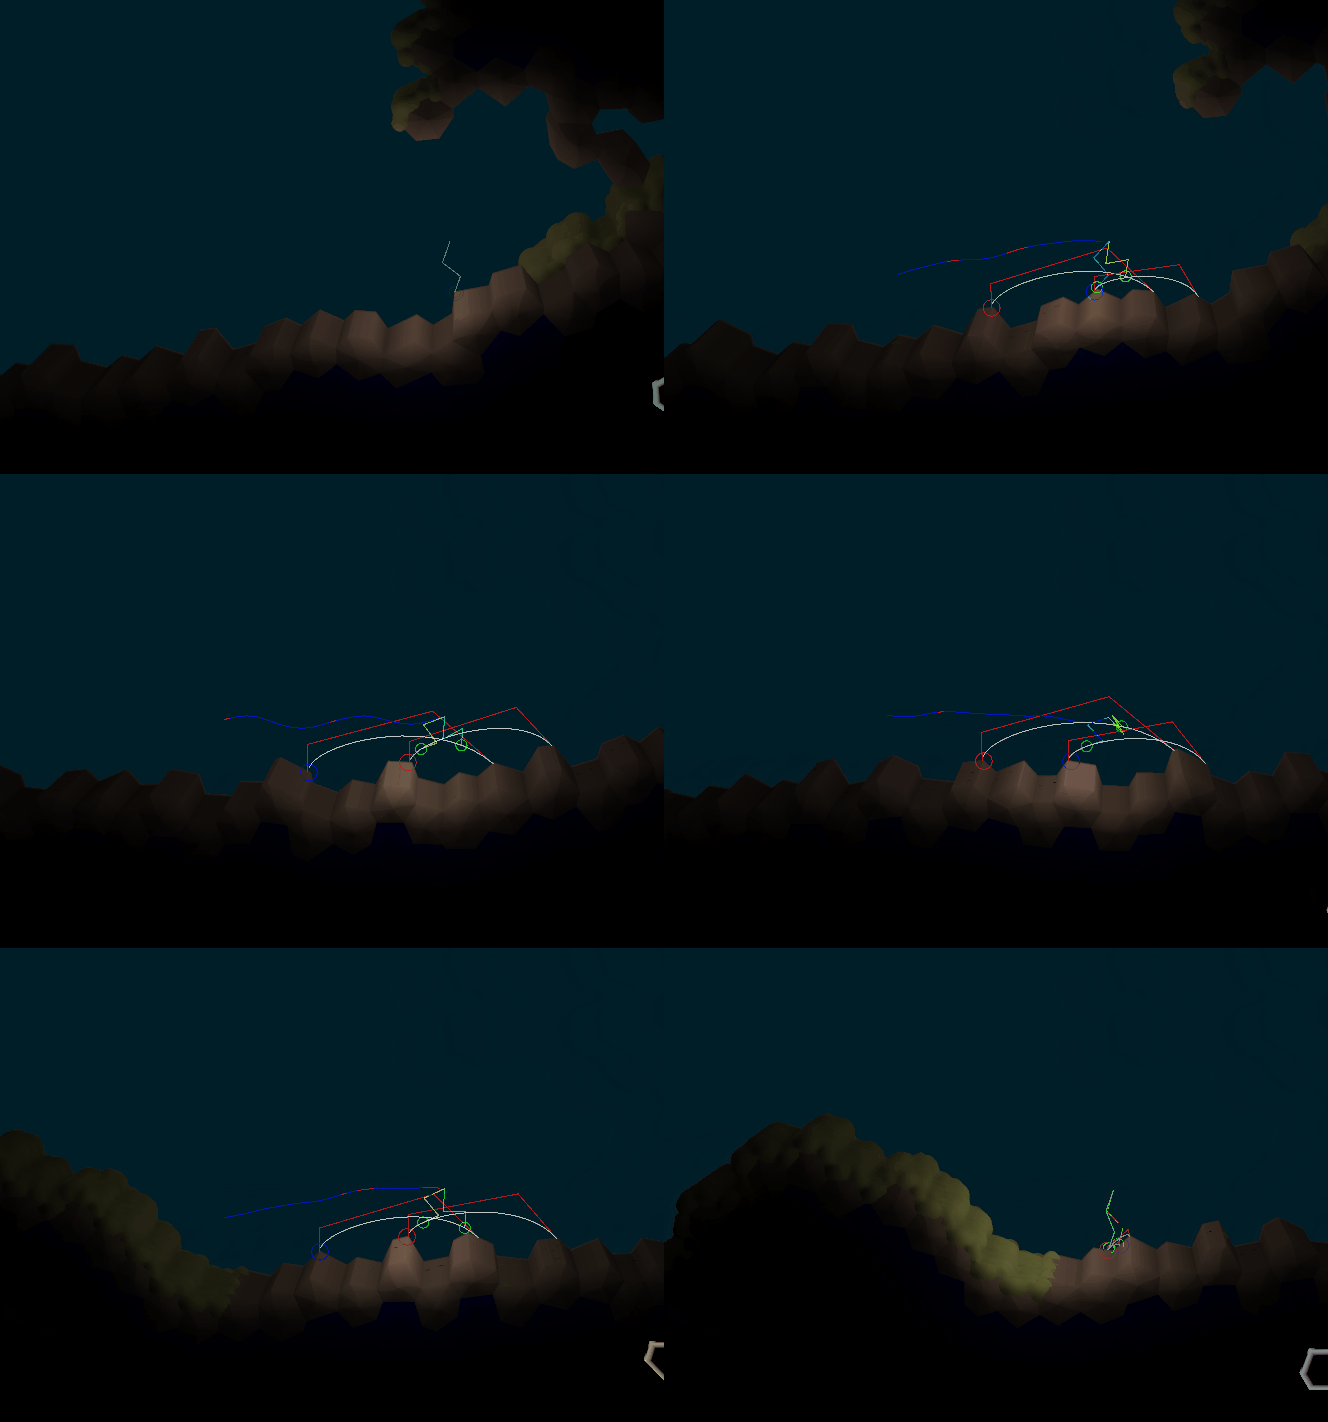
So now, we can add actual foot steps! This is where our previously mentioned inverse kinematics setup can finally show itself.
Getting airborne
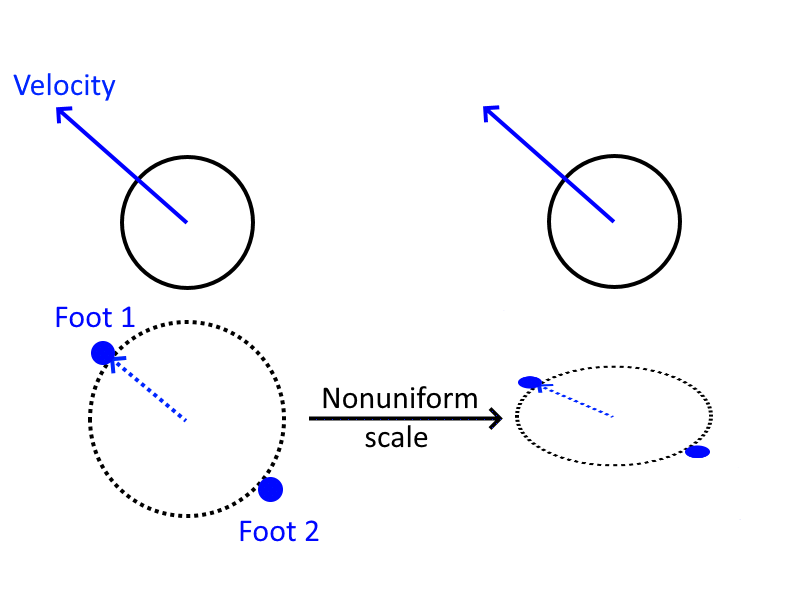
This is, for a nice change, relatively straightforward. When the player is in flight, I simply positioned their feet on the outside of a circle below their centre of mass, with the angle determined by their direction of velocity. We then squash the circle to make it an ellipse, and that’s it! The maths looks like this:
And the results look like this:
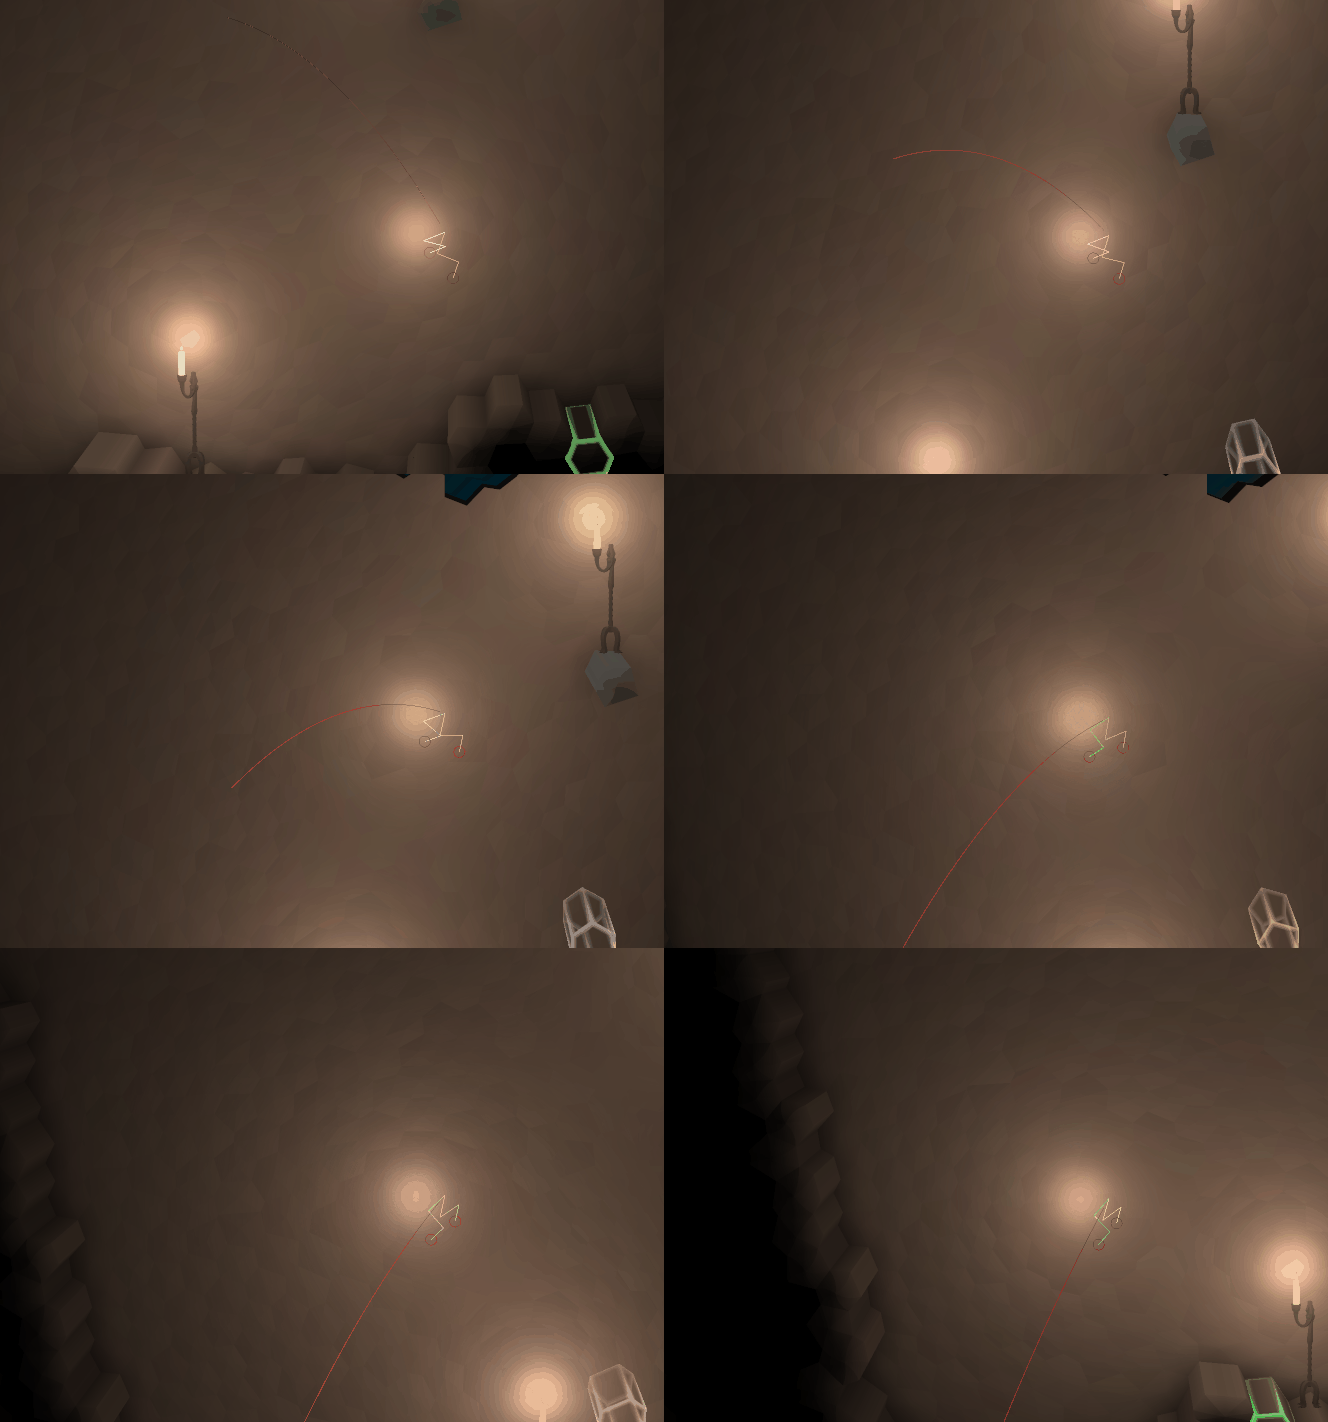
We want to scale and cap the magnitude of the velocity here so that our feet don’t end up in crazy locations when the player is falling very fast, too. There are lots of things that require you to basically mess with numbers ‘to taste’ when you’re doing what is effectively procedural art, and this is one of them.
This brings us to the next logical step, which is transitioning between running and being airborne (and vice versa). This is roughly the current stage of my research. By predicting future footfalls, we can actually get most of the way there fairly easily – detecting being airborne is simply a matter of noticing when the system can’t find any appropriate foot placements for a given foot. If that happens, I simply interpolate from the current foot position to the elliptical airborne foot positions, as described above. In the other direction, as soon as the system does detect a foot placement again, that means we’re about to land, so we start stepping towards that point. So long as we set up our stride spline so its initial velocity matches our character’s flight velocity, the transition is smooth – again, more on that in a different post.
So that brings us to the current ‘state of the art’, as it were – our best bipedal character, running a little obstacle course I put together. Note that this entire animation is the result of just running to the left – we’re not jumping or anything here.
My personal verdict? I think this is getting there. It’s not perfect, but for situations that are basically describable as ‘running along flat-ish ground and occasionally going over a drop off’, I think it’s pretty solid. At this point, while there are a few features still to add, I’m going to come back to tweaking after we have character models in and I can get a good look at a more final version to judge what needs to be done.
Lies, Damn Lies, and Tech Demos
It pays to be careful of articles like this. If you’ve ever had the experience of trying to implement a game-related algorithm based on a whitepaper or similar thing, you’ve probably had the experience of learning that actually there are huge, gaping flaws in the technique that the author conveniently neglected to mention. Even as someone who plays games and follows early press for games with cool new tech in them, you’ve probably felt that sting of noticing that things were a little on the optimistic side when they were presented at E3 (or whatever). With that in mind, there are a few things I should mention about the above techniques.
This isn’t a perfectly complete guide
I’m not confident that many people really read all the way through this kind of blog post, and I’m even less confident that anyone is going to sit down and actually implement this from start to finish. But if I’m wrong about this, and that enthusiastic person is you, be aware: Putting this technique in your game will be an adventure. This post is already way too long, and I’m not a good enough writer to fully elucidate every little detail that went into this experimentation without writing a lot more (which I hopefully eventually will). Getting this right – or at least, as right as it currently is – has been one of the more challenging pieces of development in Sun Shy so far, and I can’t really recommending attempting it if you’re not up for a bit of experimentation.
The algorithm isn’t perfectly complete yet either
There are a few situations that this doesn’t yet handle, which I’ve kind of glossed over. Our character doesn’t handle disappearing or moving foot supports yet (if, for instance, they dig out from under their own feet). Our character sometimes looks a bit weird when they turn around and change direction. We haven’t handled jumping yet. We sometimes get some weird leg shenanigans when the character lands from a high jump, or runs up a steep slope.
I’m about 80% confident that, when all is said and done, and we have a much more tweaked version of this, it will look good about 98% of the time. That last gif is an honest one – that’s how it looks when it runs situations that it has already been designed to handle, and I think it looks pretty good – when we have real character art, I think it will be pretty sweet. However, I don’t want to pretend that the algorithm never does something that looks a bit weird, nor am I certain that all those situations can be stamped out by the final release. I’ll definitely be posting more about this as I keep working on it.
Coming up next…
These last four posts have been so tightly packed because I’m terrible about procrastinating about blogging, and these represent the bulk of the research worth writing about for (my part of) the Creative Victoria project. So the next post probably won’t come in the next couple of days, but I do intend for there to be another one.
I still haven’t talked about how three-section inverse kinematics works, and I glossed over a lot of the details of using splines for stride shape – especially the bits about deciding the shape, and calculating exact velocities to get continuous motion on the feet when you have to interrupt a step. I also didn’t really talk about retargeting steps, because figuring out how to get that to look good is an ongoing process – it’s definitely necessary, though, because the best motion-prediction algorithm still can’t always guess when the player is going to change direction. I’m also going to have to talk a bit about standing still, changing direction, and eventually, dealing with situations like fighting or taking damage. So, file this under ‘ongoing research’. But it’s been a lot of fun to work on, and I’m mostly optimistic about the tasks ahead.
